Email Provider
This login mechanism starts by the user providing their email address at the login form. Then a Verification Token is sent to the provided email address. The user then has 24 hours to click the link in the email body to “consume” that token and register their account, otherwise the verification token will expire and they will have to request a new one.
An Email Provider can be used with both JSON Web Tokens and database session, whichever you choose, you must still configure a database so that Auth.js can save the verification tokens and look them up when the user attempts to login. It is not possible to enable an email provider without using a database.
Providers
Forward Email Setup
Database Adapter
Please make sure you’ve setup a database adapter, as mentioned earlier, a database is required for passwordless login to work as verification tokens need to be stored.
Setup Environment Variables
Auth.js will automatically pick up these if formatted like the example above. You can also use a different name for the environment variables if needed, but then you’ll need to pass them to the provider manually.
AUTH_FORWARDEMAIL_KEY=abc123Setup Provider
Let’s enable ForwardEmail as a sign in option in our Auth.js configuration. You’ll have to import the ForwardEmail provider from the package and pass it to the providers array we setup earlier in the Auth.js config file:
import NextAuth from "next-auth"
import ForwardEmail from "next-auth/providers/forwardemail"

export const { handlers, auth, signIn, signOut } = NextAuth({
  providers: [ForwardEmail],
})Add Signin Button
Next, we can add a signin button somewhere in your application like the Navbar. This will send an email to the user containing the magic link to sign in.
import { signIn } from "../../auth.ts"

export function SignIn() {
  return (
    <form
      action={async (formData) => {
        "use server"
        await signIn("forwardemail", formData)
      }}
    >
      <input type="text" name="email" placeholder="Email" />
      <button type="submit">Signin with Forward Email</button>
    </form>
  )
}Signin
Start your application, once the user enters their Email and clicks on the signin button, they’ll be redirected to a page that asks them to check their email. When they click on the link in their email, they will be signed in.
Check our Customising magic links emails to learn how to change the look and feel of the emails the user receives to sign in.
For more information on this provider go to the Forward Email docs page.
Resend Setup
Database Adapter
Please make sure you’ve setup a database adapter, as mentioned earlier, a database is required for passwordless login to work as verification tokens need to be stored.
Setup Environment Variables
Auth.js will automatically pick up these if formatted like the example above. You can also use a different name for the environment variables if needed, but then you’ll need to pass them to the provider manually.
AUTH_RESEND_KEY=abc123Setup Provider
Let’s enable Resend as a sign in option in our Auth.js configuration. You’ll have to import the Resend provider from the package and pass it to the providers array we setup earlier in the Auth.js config file:
import NextAuth from "next-auth"
import Resend from "next-auth/providers/resend"

export const { handlers, auth, signIn, signOut } = NextAuth({
  providers: [Resend],
})Add Signin Button
Next, we can add a signin button somewhere in your application like the Navbar. This will send an email to the user containing the magic link to sign in.
import { signIn } from "../../auth.ts"

export function SignIn() {
  return (
    <form
      action={async (formData) => {
        "use server"
        await signIn("resend", formData)
      }}
    >
      <input type="text" name="email" placeholder="Email" />
      <button type="submit">Signin with Resend</button>
    </form>
  )
}Signin
Start your application, once the user enters their Email and clicks on the signin button, they’ll be redirected to a page that asks them to check their email. When they click on the link in their email, they will be signed in.
Check our Customising magic links emails to learn how to change the look and feel of the emails the user receives to sign in.
For more information on this provider go to the Resend docs page.
Sendgrid Setup
Database Adapter
Please make sure you’ve setup a database adapter, as mentioned earlier, a database is required for passwordless login to work as verification tokens need to be stored.
Setup Environment Variables
Auth.js will automatically pick up these if formatted like the example above. You can also use a different name for the environment variables if needed, but then you’ll need to pass them to the provider manually.
AUTH_SENDGRID_KEY=abc123Setup Provider
Let’s enable Sendgrid as a sign in option in our Auth.js configuration. You’ll have to import the Sendgrid provider from the package and pass it to the providers array we setup earlier in the Auth.js config file:
import NextAuth from "next-auth"
import Sendgrid from "next-auth/providers/sendgrid"

export const { handlers, auth, signIn, signOut } = NextAuth({
  providers: [Sendgrid],
})Add Signin Button
Next, we can add a signin button somewhere in your application like the Navbar. This will send an email to the user containing the magic link to sign in.
import { signIn } from "../../auth.ts"

export function SignIn() {
  return (
    <form
      action={async (formData) => {
        "use server"
        await signIn("sendgrid", formData)
      }}
    >
      <input type="text" name="email" placeholder="Email" />
      <button type="submit">Signin with Sendgrid</button>
    </form>
  )
}Signin
Start your application, once the user enters their Email and clicks on the signin button, they’ll be redirected to a page that asks them to check their email. When they click on the link in their email, they will be signed in.
Check our Customising magic links emails to learn how to change the look and feel of the emails the user receives to sign in.
For more information on this provider go to the Sendgrid docs page.
Nodemailer Setup
Install nodemailer
Auth.js does not include nodemailer as a dependency, so you’ll need to install it yourself if you want to use the Nodemailer provider.
npm install nodemailerYou will need access to an SMTP server, ideally from one of the services known to work with nodemailer. Alternatively, Nodemailer does support other transport mechanisms.
Database Adapter
Please make sure you’ve setup a database adapter, as mentioned earlier, a database is required for magic link login to work as verification tokens need to be stored.
SMTP Transport Configuration
There are two ways to configure the SMTP server connection: using a connection string or a configuration object.
EMAIL_SERVER=smtp://username:password@smtp.example.com:587
EMAIL_FROM=noreply@example.comimport NextAuth from "next-auth"
import Nodemailer from "next-auth/providers/nodemailer"
export const { handlers, auth, signIn, signOut } = NextAuth({
providers: [
Nodemailer({
server: process.env.EMAIL_SERVER,
from: process.env.EMAIL_FROM,
}),
],
})Signin Button
Next, we can add a sign in button somewhere in your application like the Navbar. This will forward the user on to the Auth.js default signin page.
import { signIn } from "../../auth.ts"

export function SignIn() {
  return (
    <form
      action={async () => {
        "use server"
        await signIn()
      }}
    >
      <button type="submit">Sign In</button>
    </form>
  )
}Signin
Start your application, click on the sign in button we just added, and you should see Auth.js built-in sign in page with the option to sign in with your email:
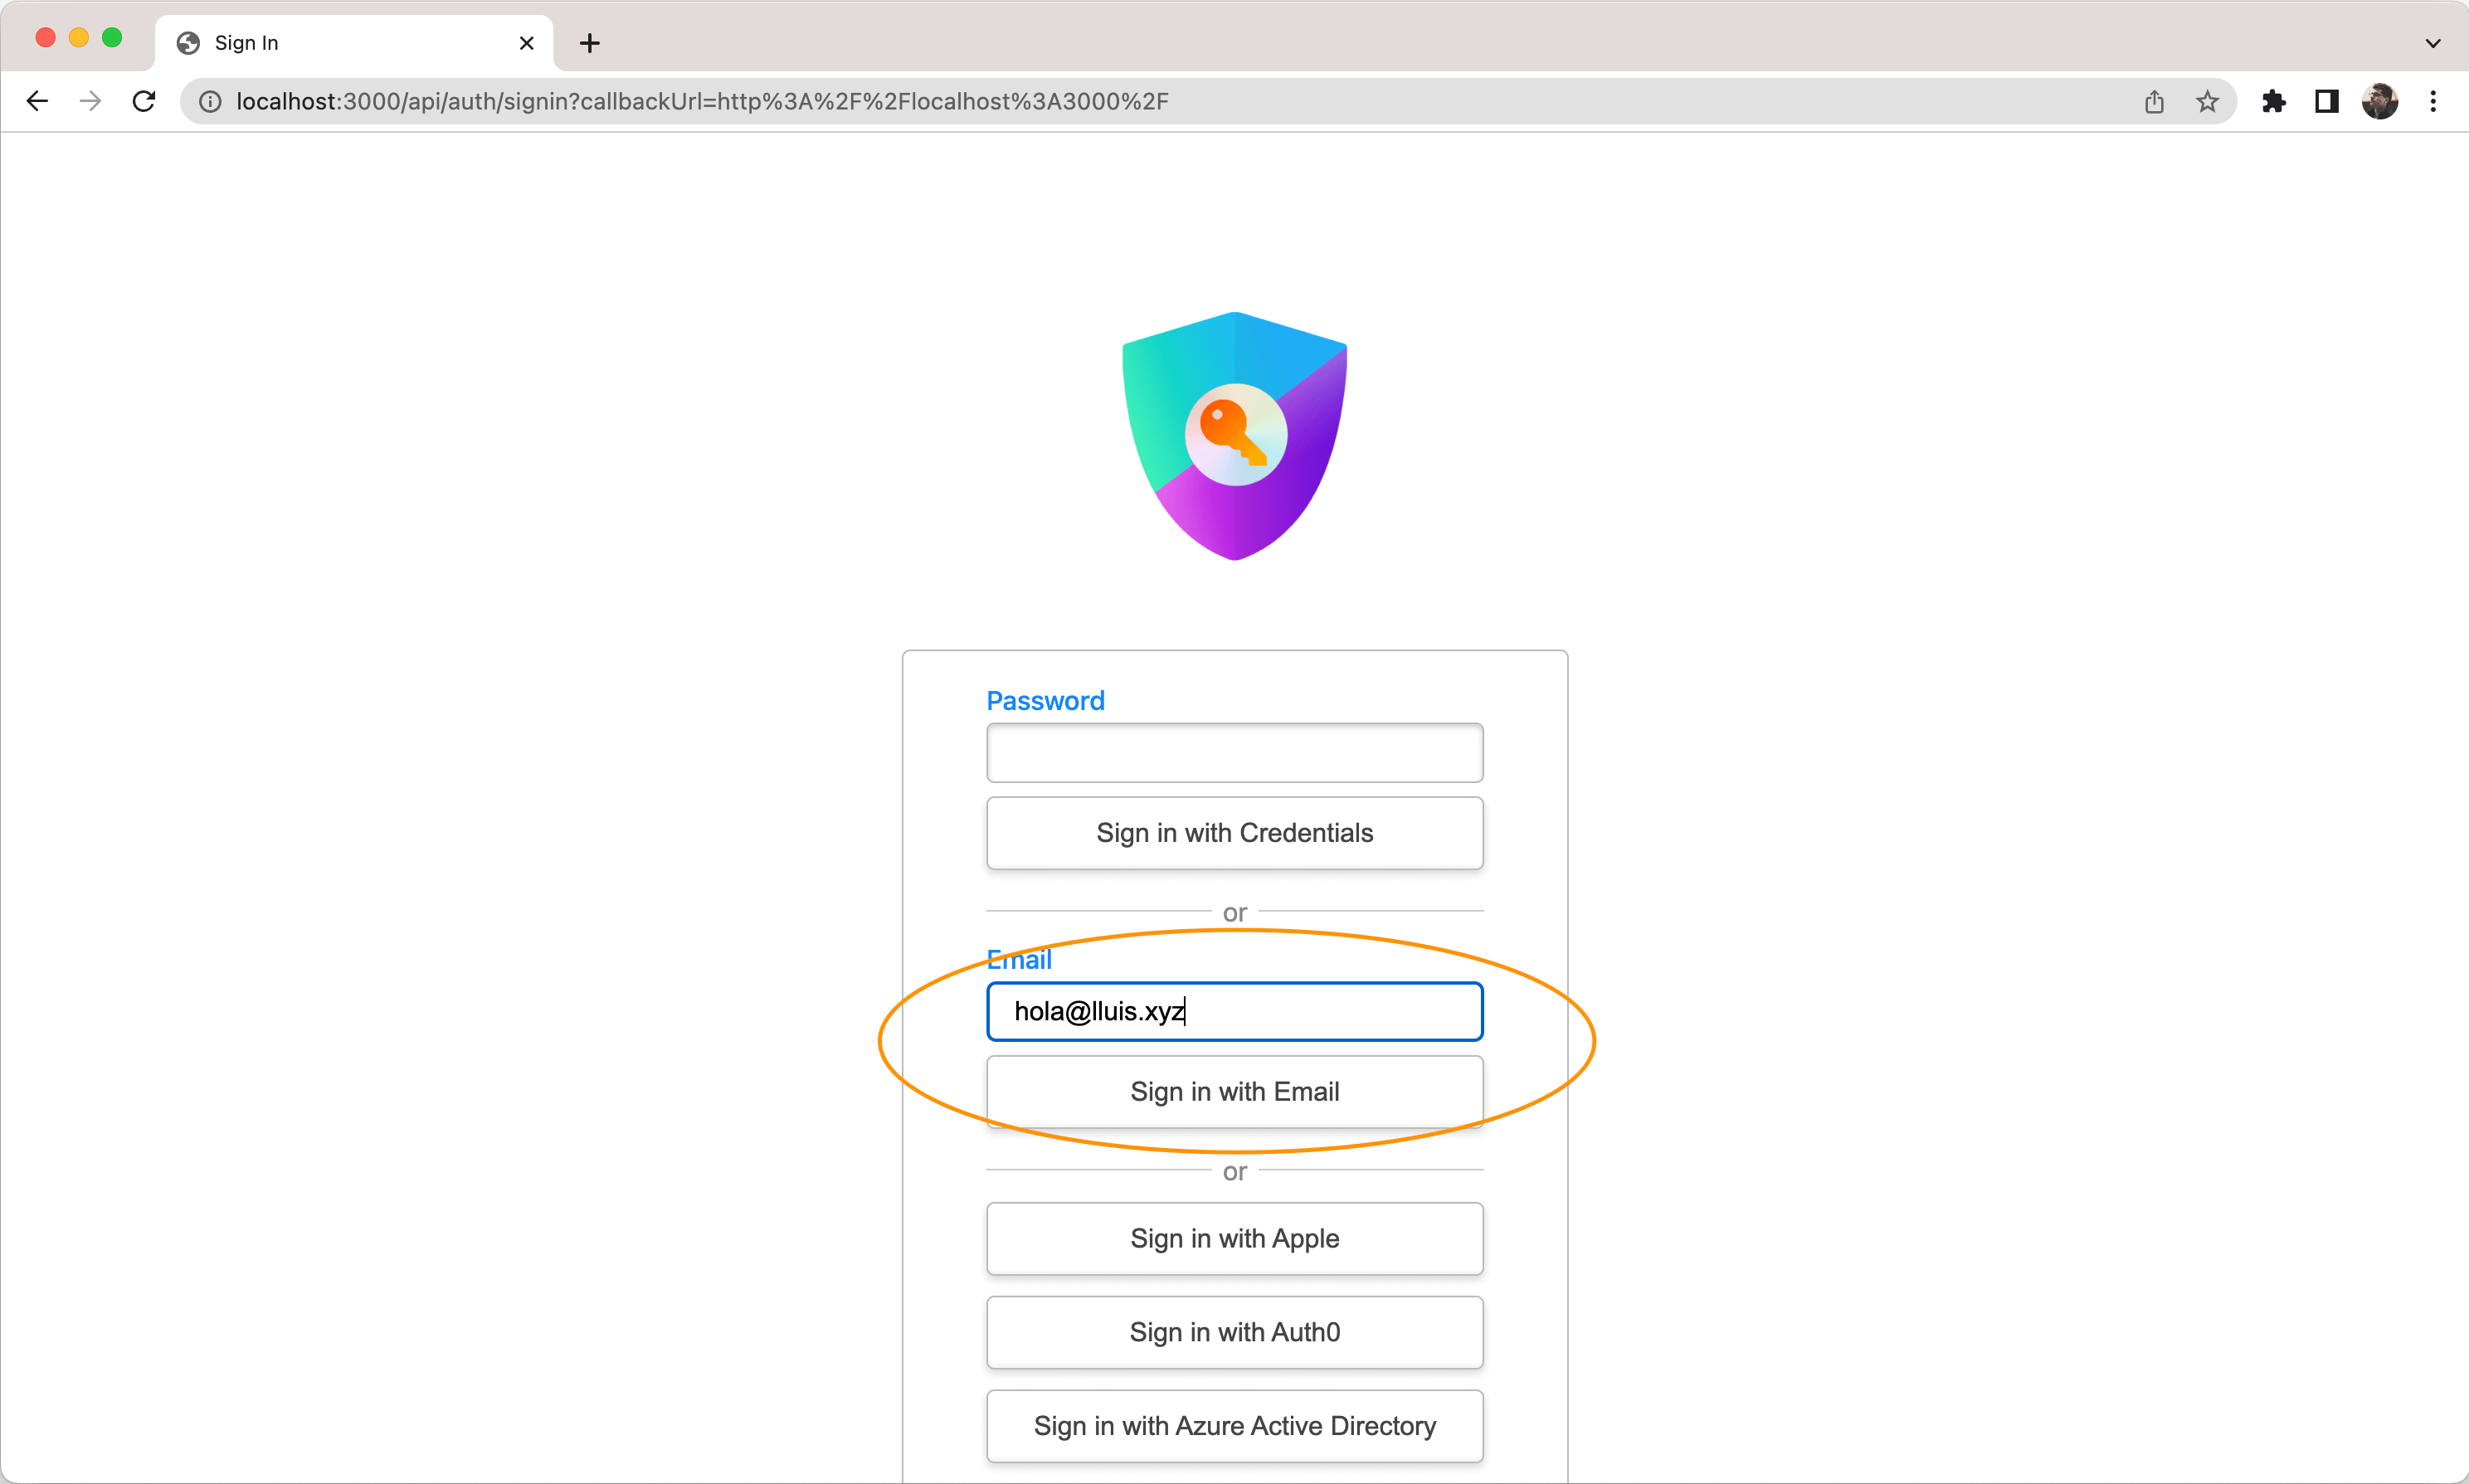
Insert your email and click “Sign in with Email”. You should receive an email from Auth.js, click on it and should be redirected to your application, landing already authenticated.
For more information on this provider go to the Nodemailer docs page.
Postmark Setup
Database Adapter
Please make sure you’ve setup a database adapter, as mentioned earlier, a database is required for passwordless login to work as verification tokens need to be stored.
Setup Environment Variables
Auth.js will automatically pick up these if formatted like the example above. You can also use a different name for the environment variables if needed, but then you’ll need to pass them to the provider manually.
AUTH_POSTMARK_KEY=abc123Setup Provider
Let’s enable Postmark as a sign in option in our Auth.js configuration. You’ll have to import the Postmark provider from the package and pass it to the providers array we setup earlier in the Auth.js config file:
import NextAuth from "next-auth"
import Postmark from "next-auth/providers/postmark"

export const { handlers, auth, signIn, signOut } = NextAuth({
  providers: [Postmark],
})Add Signin Button
Next, we can add a signin button somewhere in your application like the Navbar. This will send an email to the user containing the magic link to sign in.
import { signIn } from "../../auth.ts"

export function SignIn() {
  return (
    <form
      action={async (formData) => {
        "use server"
        await signIn("postmark", formData)
      }}
    >
      <input type="text" name="email" placeholder="Email" />
      <button type="submit">Signin with Postmark</button>
    </form>
  )
}Signin
Start your application, once the user enters their Email and clicks on the signin button, they’ll be redirected to a page that asks them to check their email. When they click on the link in their email, they will be signed in.
Check our Customising magic links emails to learn how to change the look and feel of the emails the user receives to sign in.
For more information on this provider go to the Postmark docs page.
Loops Setup
Database Adapter
Please make sure you’ve setup a database adapter, as mentioned earlier, a database is required for passwordless login to work as verification tokens need to be stored.
Create your Transactional Email Template on Loops
Loops have provided a super handy guide to help you get started with creating your transactional email template.
This provider only passes one data varaiable into the template, url which is the magic link to sign in. This is case sensitive, so make sure you use url in your template.
On the last page of Template creation, you’ll need to copy the TRANSACTIONAL ID. If you skipped this step, don’t worry, you can get this at any from the Template edit page.
Create an API Key on Loops
You’ll need to create an API key to authenticate with Loops. This key should be kept secret and not shared with anyone. You can Generate a key by going to the API Settings Page and clicking Generate. You should name the key something that makes sense to you, like “Auth.js”.
Setup Environment Variables
To implement Loops, you need to set up the following environment variables. You should have these from the previous steps.
AUTH_LOOPS_KEY=abc123
AUTH_LOOPS_TRANSACTIONAL_ID=def456
Setup Provider
Let’s enable Loops as a sign-in option for our Auth.js configuration. You’ll have to import the Loops provider from the package and pass it to the providers array we set up earlier in the Auth.js config file:
import NextAuth from "next-auth"
import Loops from "next-auth/providers/loops"

export const { handlers, auth, signIn, signOut } = NextAuth({
  providers: [
    Loops({
      apiKey: process.env.AUTH_LOOPS_KEY,
      transactionalId: process.env.AUTH_LOOPS_TRANSACTIONAL_ID,
    }),
  ],
})Add Signin Button
Next, we add a signin button somewhere in your application like the Navbar. This will send an email to the user containing the magic link to sign in.
import { signIn } from "../../auth.ts"

export function SignIn() {
  return (
    <form
      action={async (formData) => {
        "use server"
        await signIn("loops", formData)
      }}
    >
      <input type="text" name="email" placeholder="Email" />
      <button type="submit">Sign in with Loops</button>
    </form>
  )
}Signin
Start your application, click on the signin button we just added, and you should see Auth.js built-in sign in page with the option to sign in with your email. A user can enter their email, click “Sign in with Loops”, and receive their beautifully formatted signin email. Clicking on the link in the email will redirect the user to your application, landing already authenticated!
Mailgun Setup
Database Adapter
Please make sure you’ve setup a database adapter, as mentioned earlier, a database is required for passwordless login to work as verification tokens need to be stored.
Setup Environment Variables
Auth.js will automatically pick up these if formatted like the example above. You can also use a different name for the environment variables if needed, but then you’ll need to pass them to the provider manually.
AUTH_MAILGUN_KEY=abc123Setup Provider
Let’s enable Mailgun as a sign in option in our Auth.js configuration.
You’ll have to import the Mailgun provider from the package and pass it to the providers array we setup earlier in the Auth.js config file:
import NextAuth from "next-auth"
import Mailgun from "next-auth/providers/mailgun"

export const { handlers, auth, signIn, signOut } = NextAuth({
  providers: [Mailgun],
})Add Signin Button
Next, we can add a signin button somewhere in your application like the Navbar. This will send an email to the user containing the magic link to sign in.
import { signIn } from "../../auth.ts"

export function SignIn() {
  return (
    <form
      action={async (formData) => {
        "use server"
        await signIn("mailgun", formData)
      }}
    >
      <input type="text" name="email" placeholder="Email" />
      <button type="submit">Signin with Mailgun</button>
    </form>
  )
}Signin
Start your application, once the user enters their Email and clicks on the signin button, they’ll be redirected to a page that asks them to check their email. When they click on the link in their email, they will be signed in.
Check our Customising magic links emails to learn how to change the look and feel of the emails the user receives to sign in.
For more information on this provider go to the Mailgun docs page.